Translation Manual: Difference between revisions
No edit summary |
No edit summary |
||
| (23 intermediate revisions by one other user not shown) | |||
| Line 2: | Line 2: | ||
Here you'll learn how you can easily translate our English pages into your local language. | Here you'll learn how you can easily translate our English pages into your local language. | ||
Please read the below instructions in order and be sure to install the Translate | Please read the below instructions in order and be sure to install the Translate bookmarks before you continue to read further. | ||
== Install the Translate bookmarks == | <!-- == Install the Translate bookmarks == | ||
[mailto: | [mailto:itsupport@flashbay.com Email IT Support] to get the translate bookmarks installed on your computer. | ||
== On Page translation == | == On Page translation == | ||
Whether there's some English text you need to translate on one of your local pages or an existing translation you need to edit you can easily achieve this by using the Translate On bookmark that should now be installed on the bookmarks toolbar of your browser. | Whether there's some English text you need to translate on one of your local pages or an existing translation you need to edit you can easily achieve this by using the ''Translate On'' bookmark that should now be installed on the bookmarks toolbar of your browser. | ||
Note that on page translation is only suitable when you need to do a short translation or edit where no [[wikipedia::HTML_tag|HTML tags]] appear within the text. | Note that on page translation is only suitable when you need to do a short translation or edit where no [[wikipedia::HTML_tag|HTML tags]] appear within the text. | ||
| Line 19: | Line 19: | ||
=== Step 1 - Enable Translation === | === Step 1 - Enable Translation === | ||
When you land on the page where the text to be translated (or edited) is located click on the Translate On bookmark to enable translation on that page. You should now see a question mark followed by the word translate appearing in your browser's address bar: | When you land on the page where the text to be translated (or edited) is located click on the ''Translate On'' bookmark to enable translation on that page. You should now see a question mark followed by the word translate appearing in your browser's address bar: | ||
| Line 47: | Line 47: | ||
If you're happy with your new translation (or edition) you just need to save your work by scrolling all the way down the page and clicking on the green left hand side button: | If you're happy with your new translation (or edition) you just need to save your work by scrolling all the way down the page and clicking on the green left hand side button: | ||
[[File:save-translation.png]] | |||
You're almost done! | |||
===Step 4 - Disable Translation=== | |||
Once you've saved your translation work you just need to disable the translation feature to avoid loosing all your work (or someone else's) by accident when navigating across our websites. | |||
So to stay on the safe side you just need to click on the ''Translate Off'' bookmark which will remove the trailing <code>?translate</code> from the page's URL address: | |||
[[File:Homepage-translation-off.png]] | |||
Now you're done ! --> | |||
== Side-by-Side translation == | == Side-by-Side translation == | ||
== | |||
== | When using the side-by-side translation tool directly write your translations in the right-hand-side editor and never paste it from Microsoft Word or Notepad as this will break the formatting of the article you're translating. If the article is quite long, then translate one paragraph/section at a time and save your changes progressively within the side-by-side tool as detailed in the below [[#Save your work]] section. | ||
=== Step 1 - Translation request Email === | |||
Click on the country specific link in the translation request email that you've received. A side-by-side translation view (as shown in the below screenshot) should appear in your browser: | |||
[[File:Cktool-start.png]] | |||
The left hand side box contains the source English content to translate (it's there for your reference only as you cannot modify it). | |||
When you need to add a missing a translation or modify an existing one just use the right hand side box (which title contains "translation to edit") | |||
=== Step 2 - Translate or edit === | |||
Translate or edit the whole article or specific section, depending on what you've been asked in the translation request email. | |||
=== Step 3 - Review & Spell Check === | |||
Review your translation and look for any misspellings or syntax errors in your work. | |||
You can use your browser's integrated <code>Check Spelling</code> feature by right-clicking on a red underlined word : | |||
[[File:browser-check-spelling.png]] | |||
Review your translation and look for any misspellings or syntax errors in your work. | |||
You can use your browser's integrated <code>Check Spelling</code> feature by right-clicking on a red underlined word : | |||
If you're local language isn't available as a possible selection please email [mailto:itsupport@flashbay.com IT support] , they'll be able to add it on your browser for you. | |||
=== Step 4 - Preview your work === | |||
Preview the layout of your translated or edited text using the Preview button (second button from the left in the toolbar menu) to check that the translated page looks as the original English version (no broken images, same formatting, ...) : | |||
[[File:ck-tool-preview.png]] | |||
=== Step 5 - Save your work === | |||
If you're finished with Step 3 and 4 (no misspellings and layout isn't broken after preview) then you just need to save your work by clicking on the bottom 'save' button. A gentle prompt will ask you to confirm whether you're ready to proceed saving your work: | |||
[[File:ck-tool-savebox.png]] | |||
Click OK and you're done! | |||
[[File:ck-tool-saved.png]] | |||
Latest revision as of 17:57, 18 November 2020
Welcome to the Flashbay Translation Manual !
Here you'll learn how you can easily translate our English pages into your local language. Please read the below instructions in order and be sure to install the Translate bookmarks before you continue to read further.
Side-by-Side translation
When using the side-by-side translation tool directly write your translations in the right-hand-side editor and never paste it from Microsoft Word or Notepad as this will break the formatting of the article you're translating. If the article is quite long, then translate one paragraph/section at a time and save your changes progressively within the side-by-side tool as detailed in the below #Save your work section.
Step 1 - Translation request Email
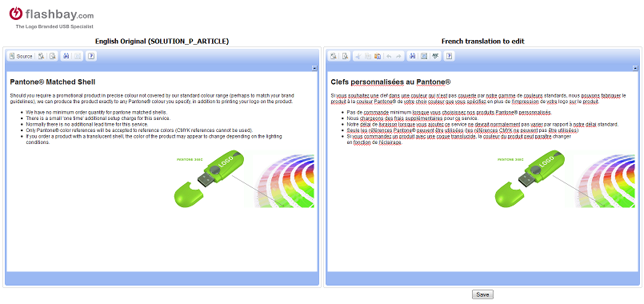
Click on the country specific link in the translation request email that you've received. A side-by-side translation view (as shown in the below screenshot) should appear in your browser:
The left hand side box contains the source English content to translate (it's there for your reference only as you cannot modify it). When you need to add a missing a translation or modify an existing one just use the right hand side box (which title contains "translation to edit")
Step 2 - Translate or edit
Translate or edit the whole article or specific section, depending on what you've been asked in the translation request email.
Step 3 - Review & Spell Check
Review your translation and look for any misspellings or syntax errors in your work.
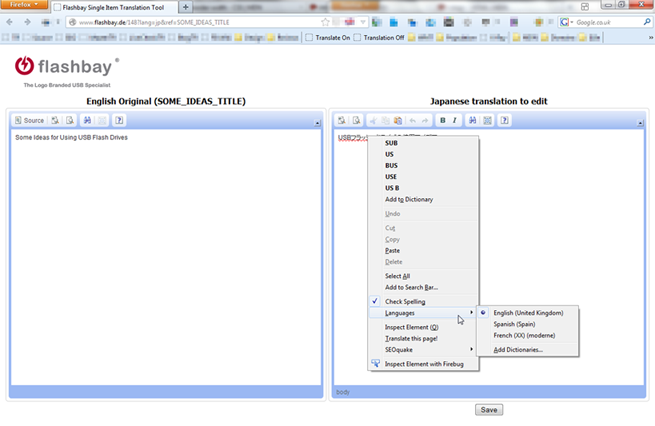
You can use your browser's integrated Check Spelling feature by right-clicking on a red underlined word :
Review your translation and look for any misspellings or syntax errors in your work.
You can use your browser's integrated Check Spelling feature by right-clicking on a red underlined word :
If you're local language isn't available as a possible selection please email IT support , they'll be able to add it on your browser for you.
Step 4 - Preview your work
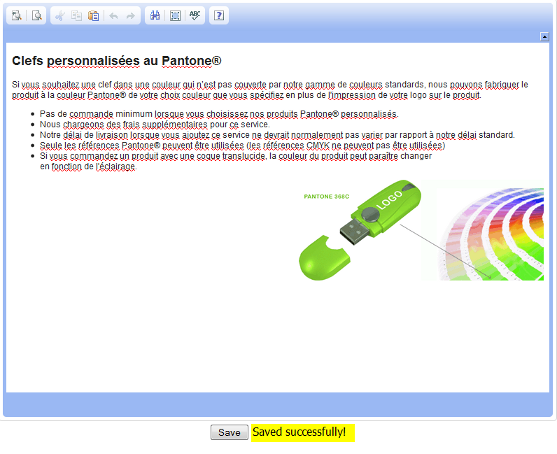
Preview the layout of your translated or edited text using the Preview button (second button from the left in the toolbar menu) to check that the translated page looks as the original English version (no broken images, same formatting, ...) :
Step 5 - Save your work
If you're finished with Step 3 and 4 (no misspellings and layout isn't broken after preview) then you just need to save your work by clicking on the bottom 'save' button. A gentle prompt will ask you to confirm whether you're ready to proceed saving your work:
Click OK and you're done!


