Netsuite
Introduction
Netsuite is the CRM/ERP software we use to manage all of our sales processes, accounting, order fulfilment etc. As a salesperson you will need to be conversant with several of its features related to CRM and order scheduling.
Access your Netsuite account by going to http://www.netsuite.com/ and clicking 'customer login'.
CRM Terminology
CRM - Acronym for 'Customer Relationship Management'.
Record - An entry into a CRM system containing information. An invoice, sales order, contact and customer are all examples of record types.
Parent record - a record to which 'child' records refer. For example, an invoice record will always belong to a customer record. The invoice is therefore the child and the customer the parent in this case.
Customer - a business/organisation that has transacted with us
Lead - a potential customer. Note a 'Lead' and 'Customer' are the same record in Netsuite, just that a customer record has a sales order belonging to it.
Sales Order - Transaction that records a commitment by us to sell items and/or services to a customer
Invoice - Itemized statement of money owed to us for goods and/or services rendered
Credit Note - Itemized statement of money owed to a customer. Credit notes are applied against open invoices or the amount due is refunded to a customer if no open invoices exist. Credit notes are issued by the Aftersales team in such cases as late delivery, malfunctioning goods, or compensation for any other service shortcomings.
Dashboard - Summary screen of customers’ sales orders, invoices and statistics
Contact - A child record of a customer containing information on an individual within the parent company (customer record).
Virtual Proof - A record which visually shows how a logo should be positioned on a product. The record contains a 'proof image' and the artwork used to create it plus additional artwork information such as pantone references and branding technique.
Leads - the basics
In Flashbay, a lead is a company/organisation potentially interested in purchasing our products and services. A lead represents the first stage of the sales cycle.
It is important to note that Flashbay does not sell to private individuals. Remember that sole traders are businesses and should not be confused with private individuals.
Additionally, Flashbay does not supply companies/organisations that: Sell any USB memory products on any website under their control (even if they wish to source all their products from Flashbay) Have a website or websites dedicated to USB memory products
Before accepting providing a lead with a quote it is necessary to thoroughly check their website(s) to ensure that they are do not fulfil the above criteria. Pay particular attention where the potential customer is a Reseller. Please also refer to the section on Competitors
Where do they come from:
- Flashbay's internet marketing - Flashbay's other marketing campaigns (mail outs, email marketing, print advertising) - You reviving interest from old, existing customers. - You cold calling new departments/offices/locations of existing customers - You cold calling new suitable companies/organisations - Happy customer referrals
How are leads assigned?
- new leads you gain yourself from your cold calling/networking are, of course, assigned to you. - new leads coming via our website are assigned equally between current sales team members of the applicable territory (excludes people on holiday). - new leads coming via phone go to the first sales team member available to take the call. - across the company, there are multiple sales teams selling to different countries. Unless special circumstances apply, you should not deal with leads outside your designated sales territory.
Relationship between Flashbay, the salesperson, and the lead/customer.
- Leads and customers are all the property of Flashbay. - In essence, Flashbay 'rents' leads to the salesperson. In return, we expect you to convert these leads into 'customers' by way of an order. - Once you have converted a lead to a customer, that customer will remain under your management, as long as this is in the best interest of the customer and Flashbay.
Lead Aging and the '9 Month Guideline'
Once a lead is assigned to you, Flashbay will generally allow you 9 months to convert that lead into a customer. If after this time the lead has not ordered, Flashbay may re-assign that lead to another Flashbay sales rep. This helps to prevent dead assets accumulating in your lead portfolio, and allows new sales reps a chance to develop a customer portfolio of their own.
Duplicates
Later in the manual, you will learn more about 'duplicates' and how to prevent them by searching in our CRM software. Please note however that before you start dealing with a 'new lead', it's essential to check whether another sales rep already deals with that very company.
Netsuite - Leads
New Lead Notification
A new lead is generated each time a first-time enquirer submits an enquiry via Flashbay's website enquiry form. Netsuite evenly distributes new leads amongst all salespersons of each country sales teams. You will receive an automatic email notification when the lead has been assigned to you.
When an existing lead/customer submits an enquiry, Netsuite will automatically recognise this if they use the same company name, and email the notification to the currently assigned salesperson.
NOTE: Sometimes a customer may use a different spelling of their company name when submitting an online form - this will lead to a duplicate problem. Thus, when you receive a new lead automatically, your responsibility is to check whether it is a duplicate of an existing lead/customer using the Netsuite global search function. If it is, inactivate the lead, and pass it to the account manager of the master (original) lead/customer in Netsuite who will answer the customer's enquiry. This quick check, each time you receive a new lead is important to prevent you stepping on the toes of another Flashbay salesperson as well as creating customer confusion and in many circumstances a loss in profit.
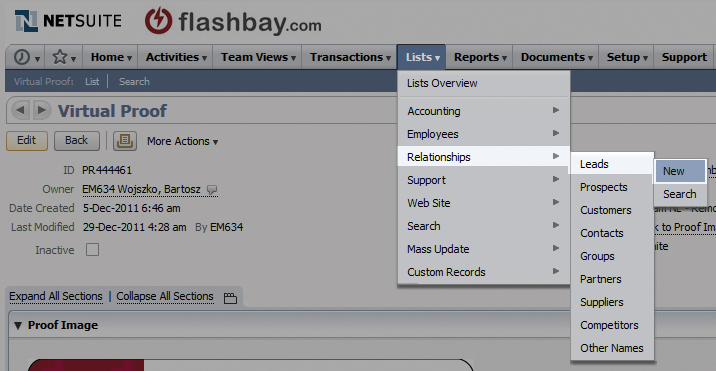
To see your leads in Netsuite click: Lists > Relationships > Leads
Use the Global Search function to find the record of an existing lead/customer.
You will find full details of the enquiry on the notification email you receive.
There are a couple of other ways in which you will receive new leads:
1) Forwarded email originally sent to contact@flashbay.com
2) By Telephone
Response times to new lead
You must send an Email reply to a new enquiry within <45 mins of receiving the lead, and also have a phone call within 1 working day.
Phone vs Email - which communication tool is best
We believe Email and Phone should be both used during the initial stage of a new lead, hence you have the best chance to convert that lead.
Email should be considered as the primary communication method for topics relating to prices, virtual proofs and important order details as such details are best communicated in writing for future reference.
The phone should be used to show the customer there is a caring person behind our pre-sales service, and can be a very powerful, persuasive tool when used in addition (but not solely in place of) to email.
Whenever you speak with a customer by phone, be sure to send an email memo afterwards.
Manually entering a new lead into Netsuite
It is important to check whether a lead/customer already exists in Netsuite before manually creating a new lead. The information you save about the lead should be completed in the format outlined below.
To manually create a new lead click: Lists > Relationships > Leads > New
Entering leads into Netsuite
All leads received should be entered into Netsuite using the following rules:
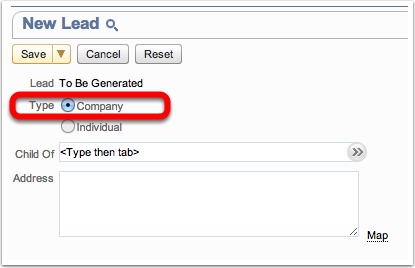
1. Genuine business or institutional (government, schools, charity etc).
These leads should be entered with the "Type" selector set to "Company".
When Type "Company" is selected the lead form displays the contacts tab as normal and multiple contacts can be added for the company.
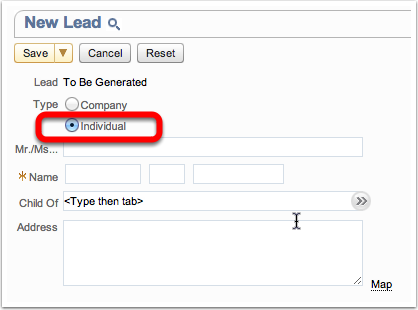
2. Private individuals or leads from free email addresses which do not specify a company name.
These leads should be entered with the "Type" selector set to "Individual".
When Type "Individual" is selected the lead form does not display the contacts tab as individuals by definition will only have a single contact, details of which are entered directly on the lead form.
3. Any lead which upon initial investigation would be considered as coming from a competitor.
These leads should be entered with the "Type" selector set to "Company" or "Individual" as appropriate.
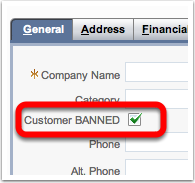
The word "BANNED" should be appended to the name and the "customer BANNED" checkbox should be ticked.
There is no requirement to add contacts for leads of Type "Customer" when they are entered as banned from the outset.
Following these rules ensures that the Sales Pipeline and associated statistics function correctly, giving credit for converted leads and ensuring that those leads that should not be considered in such calculations are accurately excluded.
It is strictly forbidden to create 'dummy' customer records and then add new leads to them as contacts (for example, creating C12345 My Private Leads and then adding new leads as contacts to this record).
Every incoming lead must either be entered as a new lead using the above rules or added to an existing lead / customer record if the incoming lead is from a new contact within the same company.
Furthermore, it is wholly unacceptable to purposely misclassify incoming leads as Individuals or Banned when they should have been classified as of type "Company" according to the above rules.
You need to enter at least the following data into the new lead record:
Company Name: Ensure capitalisation and spelling are accurate - the company’s true name and not their trading name should be entered.
Category: Blank by default (more info below on customer categories)
Phone: Omit 00 or + before country code and leave no spaces between numbers. e.g. 442073717333 is how our office number should be written.
Alt. Phone & Fax: Enter in the same format as phone number if information is available.
Email Address
Customer's website Enter when available so you gain quick access to all his information.
Payment Terms: By default, the payment terms of a new customer are set to advance payment. If a lead is converted into a customer, an advanced payment invoice will be emailed to the address saved in the above field.
Territory: This dictates the language which documentation will be sent to contacts.
Click ‘Save’ once you have completed the above fields.
Now move on to setting up the contact record which belongs to the customer record you just setup.
Creating a New Contact
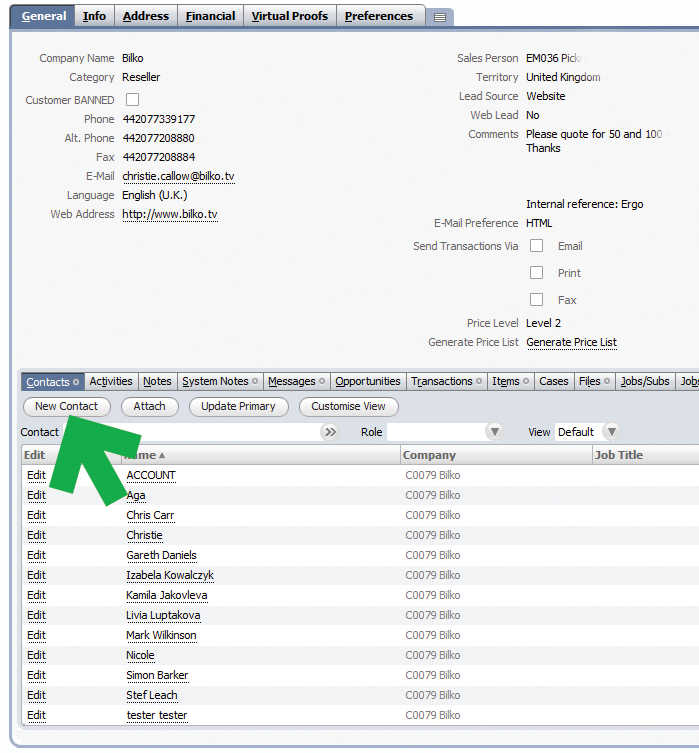
All contacts of a lead/customer should be set up in Netsuite, even if their email address is saved on the global record. Click ‘New Contact’ and fill in the fields accordingly. Only email addresses saved under the Contacts section of the General tab in Netsuite are able to gain access to the website’s Customer Centre.
Netsuite - Customer Categories
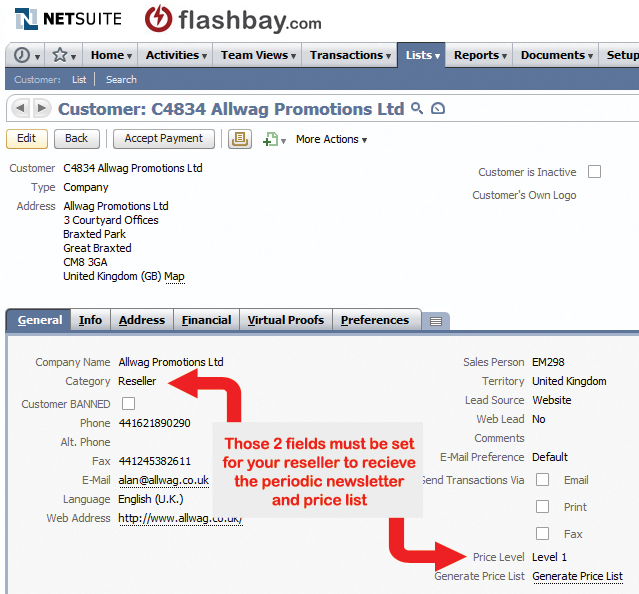
For the purposes of Netsuite, we essentially supply 2 types of customers – resellers and 'final customers'. There are a few settings in Netsuite to be aware of when managing resellers. If you are unsure of the lead’s nature of business, it is recommended to view their website to find out more information. This will help differentiate the lead between a reseller and a 'final customer'.
If you are dealing with a reseller, the ‘Category’ field in their Netsuite record should be set to Reseller. The category for 'final customers' should be left blank or set to Education if applicable. The latter will make it easier for anyone viewing the record to know they are looking at that of an educational establishment.
Netsuite - Customer Preferences Tab
There are 5 fields in the global record Preferences tab. By default they will all be set to Yes.
General Newsletters? Untick this box if you wish for the customer's contacts to never
receive newsletter emails.
Post Order Marketing Drip? Untick this box if you wish for the customer's contacts to never
receive periodic order reminder emails.
Reseller Price Update Untick this box if you wish for the customer's contacts to never
receive automatic price updates.
Auto Credit Control Untick this box if you wish for the customer's contacts to never
receive automatic invoice payment reminders.
There is also a Preferences tab in every contact’s profile. The same options are available here; however any settings that you alter will affect the individual contact ONLY and not all contacts on the global record.
Netsuite - Scheduling a Sales Order
Introduction
The process of scheduling a sales order is much easier if you begin by updating the parent customer record with the correct currency, VAT number, billing address, shipping address, contacts etc.
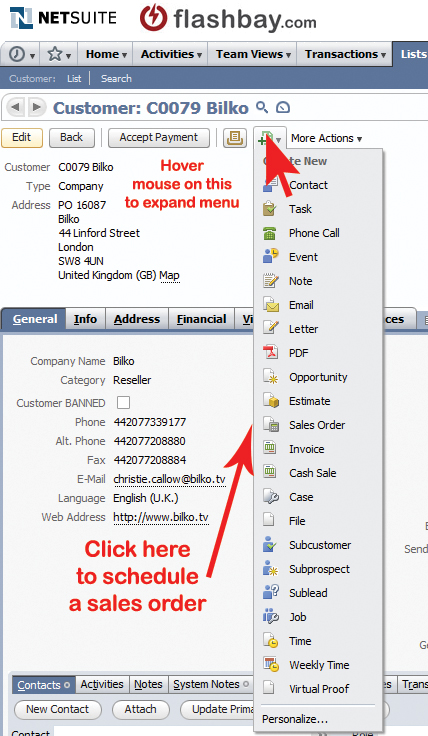
To initially create the sales order record, first go to the lead/customer record in Netsuite.
Press the Sales Order button as above, and you will be directed to a new page (see image above if you cannot see the button).
Field by Field Guide
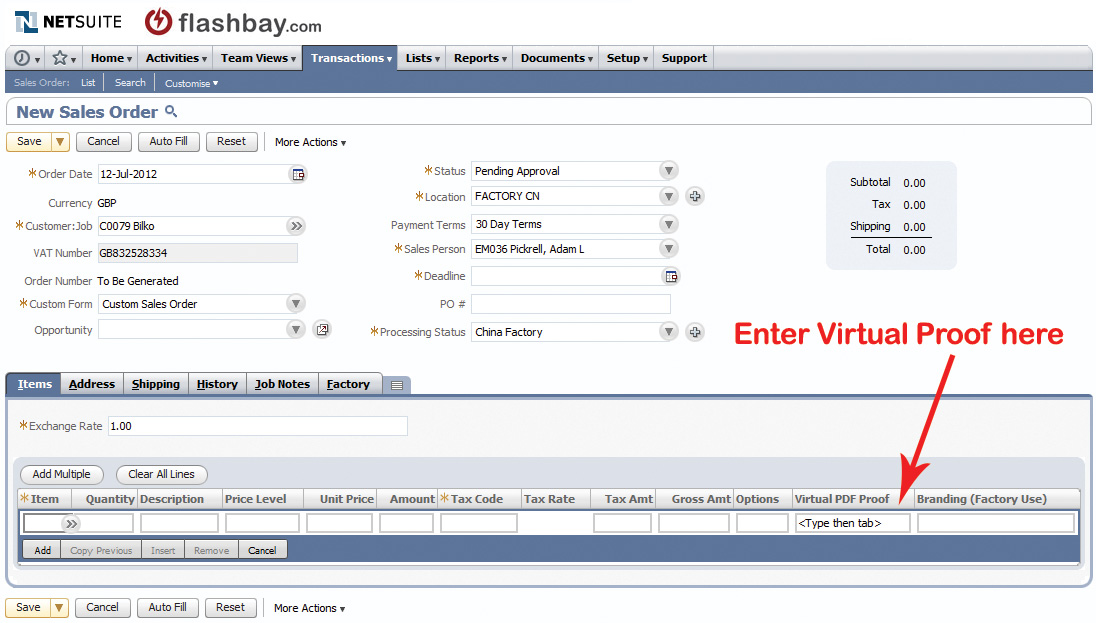
Your blank sales order should look like this:
Items Tab
(i) Add items using the appropriate product code (product codes can be found on the website or price list). Check that you have selected the correct memory size and colour
(ii) Enter required quantity
(iii) Enter agreed unit price
(iv) Select the correct Tax Code:
VAT: S for UK and EU countries where no valid VAT number is provided
VAT: ES for all EU countries if a valid VAT number is provided
VAT: CH for Switzerland
VAT: AU for Australia
VAT: NO for Norway
VAT: O for other countries outside the EU
Various VAT codes apply for sales to North American customers. Consult your team leader for detailed information.
(v) Enter the respective virtual proof number or click on the double arrows to load a list of virtual proofs belonging to the customer.
(vi) Click Add to insert more items, otherwise click the Address tab.
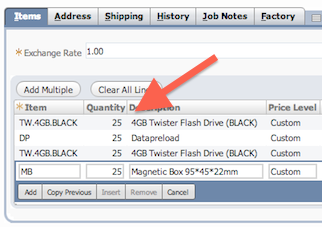
To specify the convention of a product and accessory or service please proceed like the following:
Example using convention:
- 50 X TW
- 50 X DP - means DP belongs to TW
- 50 X KN
- 50 X MB - means MB belongs to KN
A more complex example, using the convention:
- 50 X TW
- 25 X DP - means 25 of TW will have data (& 25 no data)
- 50 X KN
- 25 X DP - means 25 of KN will have data (& 25 no data)
- 50 X TX
- 50 X MB - means MB belong to TX
In below example the customer will receive 25 Twister Sticks with Data uploaded(no boxes) and another 25 Twister Sticks in 25 Magnetic boxes(no data).
Address Tab
Each order requires a billing and shipping address. Click the drop-down menu to either enter a new address; select a previously used address; or to customise a previously used address.
Shipping Tab
(i) Leave the Ship Via field as "Delivery" or set to "FREE DELIVERY" as appropriate
(ii) Enter the agreed charge for Shipping
(iii) Check the Shipping Tax Code is correct.
Job Detail tab
Enter any information specific to the order in Job Notes. If the order is for a reseller remember to write ‘please ship under plain cover’. Examples of other types of information that should be included in Job Notes would be:
a) Print quantity A using PR----1 and print quantity B using PR----2
b) 2 shipping addresses. Ship 100 units to shipping address and ship 50 units to:
A N Other 1234 ABCD Street ABCD United Kingdom Tel: 44123412341234
Job Notes for most standard orders should be left blank. There is no need to repeat obvious information in this area.
Deadline
A deadline must be specified on each order. You must pay particular attention to lead times when communicating with customers to avoid deadline problems. The standard lead time of each product is shown on the website. You should consult Operations(operations.cn@flashbay.com), to confirm whether we can achieve a deadline within the standard lead time if your order is over 3,000 units or has items/services falling outside our standard offering.
PO number
If your lead/customer supplies their own order reference, add this to the PO # field. This reference will subsequently show on their invoice.
Double check
Refer to the Sales Order Check List and cross reference your entry meticulously with the confirmation email received from your lead/customer to avoid mistakes.
Netsuite - House Keeping Your Records
Introduction
Whether you are a new salesperson taking over someone else's customer accounts or an experienced salesperson, there are times when your customer data in Netsuite needs some cleaning up or 'House Keeping'.
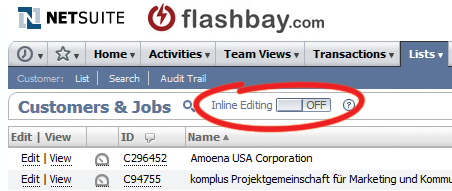
Here are some common tasks you should do once in a while to keep things in order. Before reading further ensure you know how to edit records in Netsuite in 'list edit' mode.
Price Levels
Aim: Every Customer or Lead Record should have a Price Level assigned.
Why: So you know what you quoted your customer previously, so customer can login to the customer centre and see their personalised prices, so we can conduct email marketing and send customer the correct price list, so someone can quote customer if you are ill, so we can keep activities standardised and efficient.
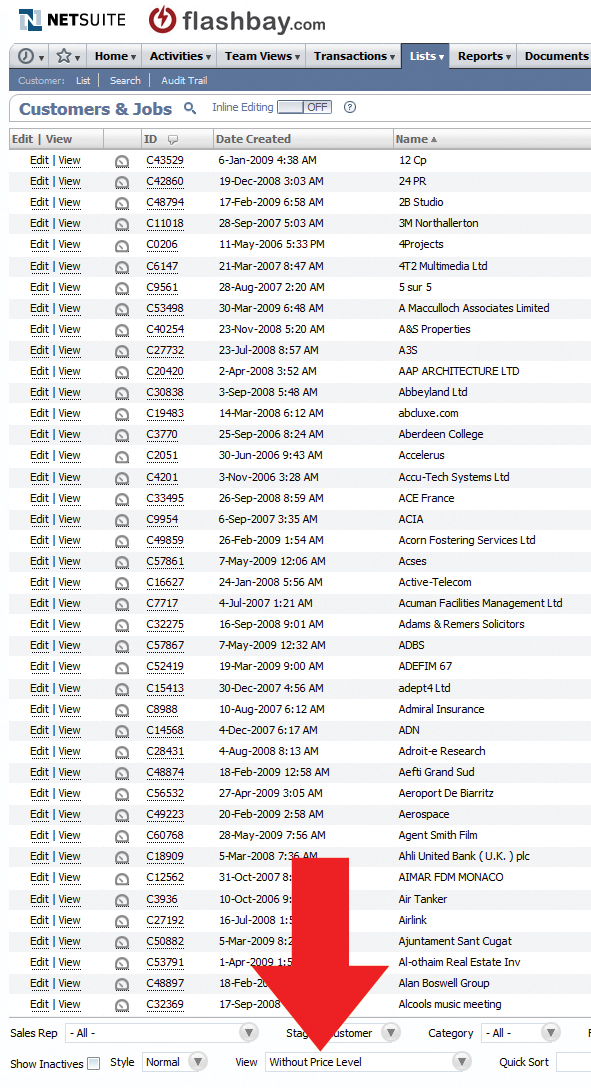
How: View your list of customers in Netsuite, then select this drop down box to 'Without Price Level' to see which records need their price level set. Edit in list edit mode.
Contacts
Aim: Every Customer or Lead record should have at least 1 contact record associated with it. Of course if there are more contacts in the company you know of, these should be added too.
Why: Other than the obvious reason of saving this important data, this record is important in our marketing efforts.
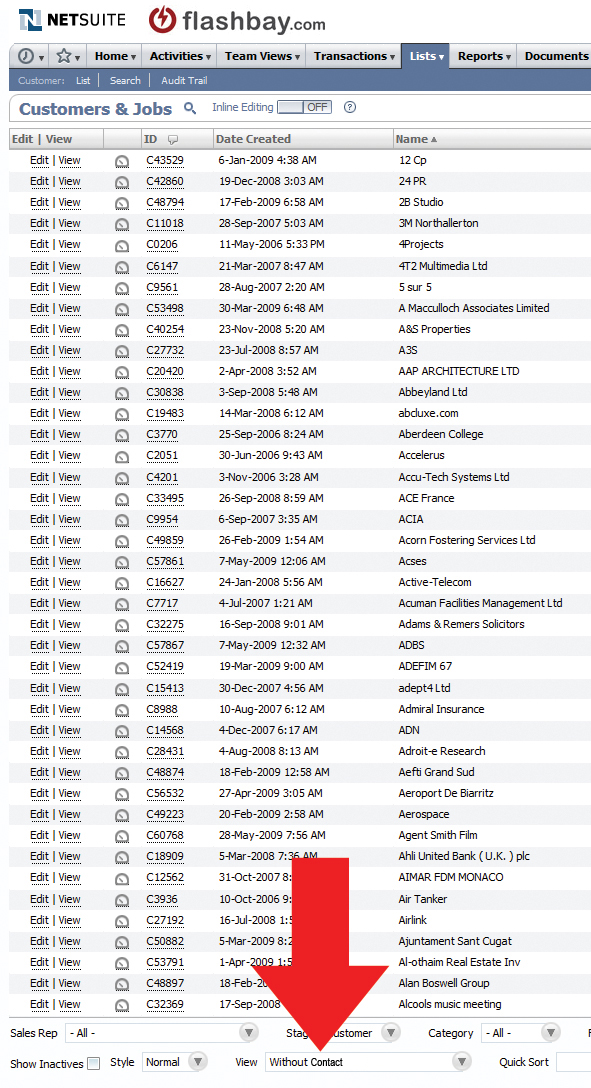
How: View your list of customers in Netsuite, then select this drop down box to 'Without Contact' to see which records need a contact adding. Edit in list edit mode.
Company Names
Aim: Company Names should be accurate with correct capitalisation. Additionally the name should reflect the true company's legal name and not their 'trading' name.
Why: Customers see how their name looks in the customer centre, on marketing emails, on invoices. Best to display it correctly.
How: View your list of customers in Netsuite, ensure you are in 'list edit' mode, then go down the list to correct any bad data. Edit in list edit mode.
Incorrect data
Aim: Sometimes we get people who fill in online forms with bogus information or fake company names. You should inactivate these customer records.
Why: Because we don't want to count them as real customer accounts assigned to you if they are not.
How: View your list of customers in Netsuite, click edit on bad records and inactivate them. Never inactivate legitimate leads or customers!
Duplicates
- see dedicated section on duplicates.
Netsuite - Duplicate Records
How do they occur?
From the online customer form:
Occasionally a contact from an existing lead/customer will submit an enquiry, but enter their company name slightly differently to what we have saved in Netsuite. When this happens, a duplicate record is usually generated. The first thing you need to do when viewing a new lead is to check whether it is a duplicate.
Human error:
Salesperson does not thoroughly check whether a lead is already in Netsuite before manually creating a new one.
Why are they a problem?
The existence of duplicate records can cause problems in any company, and you should always act to minimise the risk of their creation and eliminate them when discovered.
Example:
Customer 'X-Ray Systems' is duplicated as 'C1324 X-Ray Systems' and 'C7287 xray Systems'.
Master record: C1324 X-Ray Systems, has 3000 Euro trade credit with Flashbay setup in the financial tab of the customer record.
Duplicate record: C7287 xray Systems, has 3000 Euro trade credit with Flashbay setup in the financial tab of the customer record.
Outcome: Flashbay is exposing itself to additional unknown credit risk. An inexperienced salesperson could unknowingly schedule orders on both accounts which together total over 3000 Euro value, but neither credit limit would be reached.
Other problems may include that the customer cannot login to the customer centre, the salesperson cannot see the complete order history in Netsuite etc
Discovering Duplicate Records:
Here are 2 common ways to discover duplicate records while going about your normal duties.
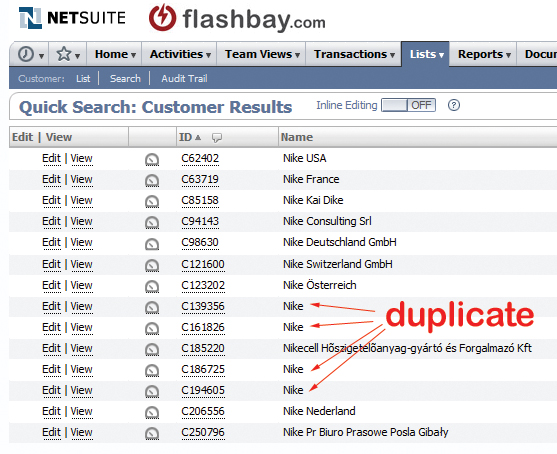
1) By searching in the global search to discover 2 matching customers:
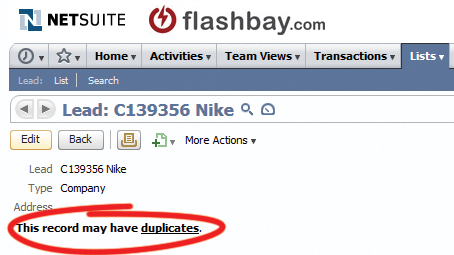
2) When viewing a customer record and seeing the Netsuite duplicate warning
How to Eliminate:
Email your respective team leader to eliminate any duplicate records you encounter.

